An insurance claim is created from the Account module. Generally, all you have to do is click the New Claim button, and all procedures that have not been billed to insurance will have a claim created for them. If they also need to be billed to secondary insurance, a secondary claim will be created with a status of 'hold'. If you need to have more control over the claim creation process, you can highlight the procedures that you want to create the claim for. Also, there is a small drop-down arrow on the right side of the New Claim button. You can use this to create a primary, secondary, or supplemental claim manually. This can be useful if the patient no longer has current coverage under an insurance plan, but you still need to send a claim. Once you click to create the claim, the following window will open:
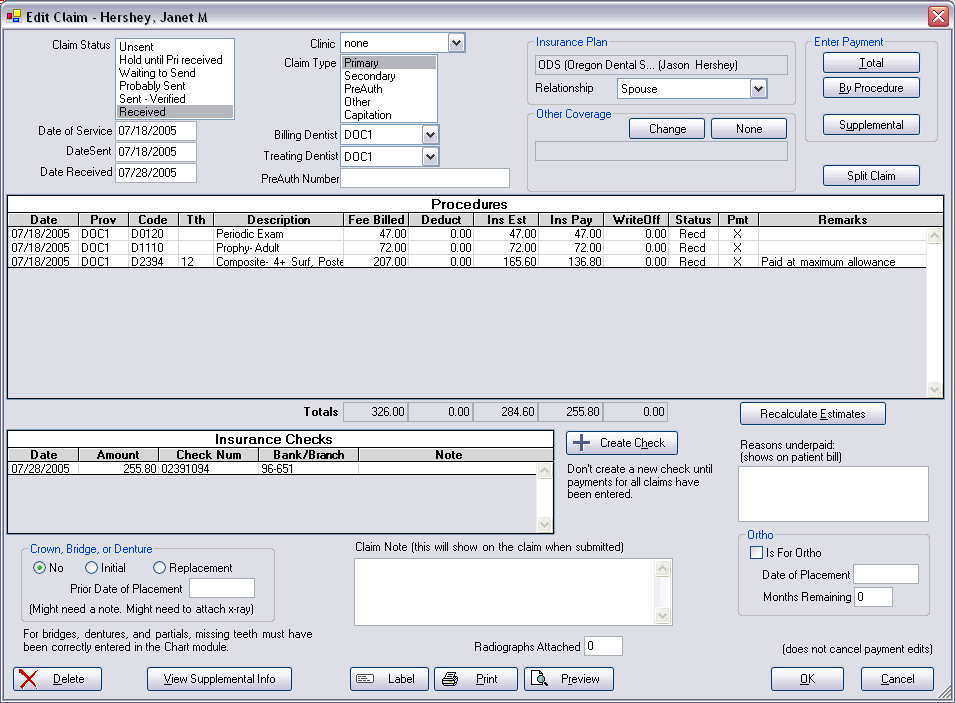
This is a fairly complex window with lots of information at a glance.
Status
Starting at the upper left, every claim
has a status. 'Unsent' means the claim has been created, but not sent. 'Hold' is
used for secondary claims that should not be sent until the primary claim is
received. 'Waiting' means that the claim will display in the Send Claims window and
is ready to be printed or sent electronically. 'Probably sent' means that the
claim has been printed or sent electronically, but that the process has not yet
been verified. As soon as you are sure the claim has been sent or printed, you
can change the status from within the Send Claims window to Sent. 'Sent' means
the claim has been sent and verified. It will no longer show in the Send Claims
window. It will show on the Outstanding Insurance
Claims report so that you can track it and make sure it gets paid in a
timely manner. 'Received' means that the claim has been received back from
insurance, either with a payment or denied for some reason. Usually the claim is
marked received automatically when you click one of the Enter Payment buttons at
the upper right.
When you create a claim for a patient with dual coverage, both claims are automatically created at the same time. The primary claim will have a status of Waiting to send, and the secondary claim will have a status of Hold. The secondary claim will stay in the patient's account with Hold status until the primary claim is received. Once the primary claim is received you can send the secondary claim, but be sure to verify the estimates on the secondary claim first.
Dates
The date of service should be the same
date as the earliest procedures which are attached to the claim. The date sent
will be automatically filled in when creating the claim, but you can change it
later if you want. The date received is automatically filled in when you enter a
payment using one of the buttons at the upper right.
Top Section
The claim type is set when you
create the claim. It is there for reference, but you are not allowed to change
it because it affects so many other fields. Likewise, the insurance plan to the
right of the claim type is set when you create the claim and it can not be
changed. If you have attached it to the wrong insurance plan, you would have to
delete the claim and recreate it. The billing dentist and the treating dentist
are set when the claim is created, but you are allowed to change them. The only
reason there is a field for the treating dentist is that some claim formats
require it. You can still assign a different dentist for each procedure. The
PreAuth number is used if you have previously sent in a preauthorization and
have received a preathorization number back from insurance. The number that they
give you should be entered here.
The other coverage section is where you enter in other coverage for the patient. This section will be filled in for you automatically when you create the claim. For instance, if the patient has primary and secondary coverage set up, then this section would show the secondary coverage. You can change it at any time.
The enter payment area at the upper right is covered in Claim Payments. An explanation for the Split Claim button is also on that page.
Claim Procedure List
See the Claim Procedures
section for information on how the procedures are attached and how to edit
them.
Insurance Checks List
See the Claim Payments
section for information on how to enter various types of payments.
There are two separate steps for entering payments: .
1.
First, you enter the payments for each patient separately using
one of the three buttons at the upper right.
2. Then, you create the check
that combines payments from multiple patients.
For bridges, dentures, and partials, Missing Teeth must have been correctly entered in the Chart module.
Clicking the View Supplemental Info button at the bottom of the window will bring up the following screen:
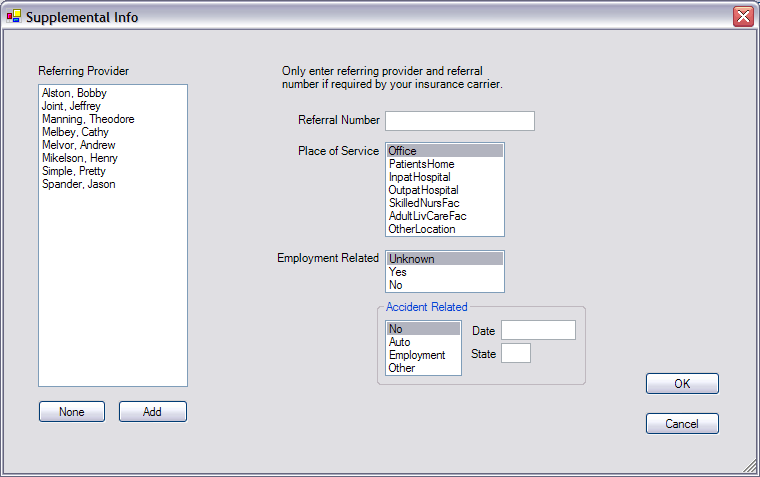
These are fields that are used rarely, so they are hidden to prevent clutter. They are for special insurance situations. If you don't know what they are for, you can just leave them as they are. All referral sources will show on the list above, and you will be able to select the referring provider from the available choices or add a new referral. See the Referral section for more information.
You can print or preview the claim directly from the Claim window by clicking one of the buttons at the bottom, but it is much more common to just click OK, leaving the claim status as 'Waiting to send'. Then, it will show in the Claim Send window where the claims can be printed or sent electronically as a batch at the end of the day.